English
 Espaol
 Franais
 阿拉伯
阿拉伯 中文(簡)
中文(簡) Deutsch
 Italiano
 Português
 日本
日本 韓國
韓國 български
 hrvatski
 esky
esky Dansk
Dansk Nederlands
 suomi
suomi Ελληνικ
 印度
印度 norsk
norsk Polski
 Roman
Roman русский
 Svenska
美國約翰迪爾挖掘機機油壓力傳感器RE539840空氣溫度傳感器拆卸和安裝凸輪軸位置傳感器6105A和6125A發動機配件資料
美國約翰迪爾挖掘機機油壓力傳感器RE539840空氣溫度傳感器拆卸和安裝凸輪軸位置傳感器6105A和6125A發動機配件資料
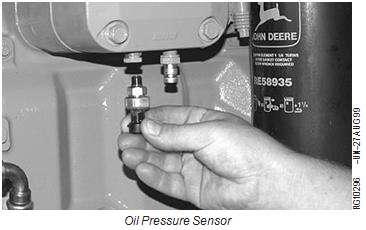
Remove and Install Oil Pressure Sensor
The ECU monitors engine oil pressure for engine protection purposes. Under low oil pressure conditions, the ECU will derate engine power and in some applications, may shut the engine down. A diagnostic trouble code or warning light is generated.
1. Disconnect oil pressure sensor wiring connector and remove sensor from oil cooler housing.
2. Coat sensor O-ring with JDT405 High Temperature Grease. Coat threads of sensor with LOCTITE 592 Pipe Sealant with TEFLON. Install sensor in oil cooler housing and tighten to specifications.
Specification
Engine Oil Pressure Sensor—
Torque .............................................................................. 9 N•m (80 lb-in.)
Engine Oil Pressure Sensor Adapter-to-Filter Housing—
Torque ............................................................................ 11 N•m (97 lb-in.)
3. Install sensor wiring connector.
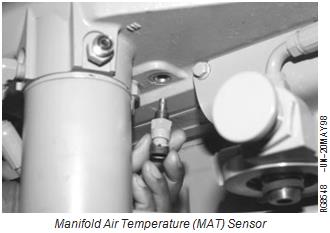
Remove and Install Manifold Air Temperature (MAT) Sensor
The ECU uses the manifold air temperature and manifold absolute pressure sensor signals for engine airflow calculations.
1. Disconnect manifold air temperature sensor wiring connector.
2.Remove sensor from bottom side of intake manifold (6105H and 6125H engines) or aftercooler (6105A engines).
3. Coat O-ring with JDT405 High Temperature Grease.
4. Install MAT sensor in bottom side of intake manifold or aftercooler. Tighten to specifications.
Specification
Manifold Air Temperature (MAT)
Sensor—Torque ............................................................. 10 N•m (7.5 lb-ft)
5. Install sensor wiring connector.
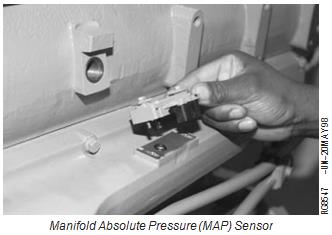
Remove and Install Manifold Absolute Pressure (MAP) Sensor
The ECU uses the manifold absolute pressure and manifold air temperature sensor signals for engine airflow calculations.
1. Disconnect manifold absolute pressure sensor hose (6105A and 6125A engines) and/or wiring connector.
2. Remove sensor from intake manifold or aftercooler.
4. Coat O-ring with JDT405 High Temperature Grease.
5. Install sensor on intake manifold or aftercooler. Tighten two cap screws to specifications.
Specification
Manifold Absolute Pressure
(MAP) Sensor—Torque ....................................................... 7 N•m (5 lb-ft)
6. Connect hose (6105A and 6125A engines) and /or wiring connector.
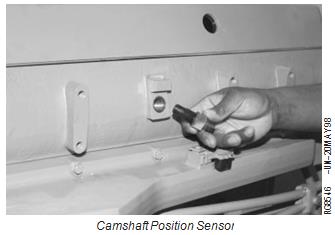
Remove and Install Camshaft Position Sensor
IMPORTANT: Camshaft position sensor MUST BE removed for camshaft removal and installation.
The ECU monitors the position of the camshaft and crankshaft to determine piston position and the optimum time to start and stop injecting fuel. The camshaft position sensor monitors camshaft position and sends it to the ECU.
1. Disconnect camshaft position sensor wiring connector.
2. Remove sensor from cylinder head.
3. Coat O-ring with JDT405 High Temperature Grease.
4. Install sensor in cylinder head. Tighten to specifications.
Specification
Camshaft Position Sensor—
Torque ............................................................................. 14 N•m (10 lb-ft
Remove and Install Crankshaft Position Sensor
NOTE: Crankshaft vibration damper and front seal shown removed.
The ECU monitors the position of the crankshaft and camshaft to determine piston position and the optimum time to start and stop injecting fuel. The crankshaft position sensor monitors crankshaft position and sends it to the ECU.
1. Disconnect crankshaft position sensor wiring connector.
2. Remove sensor (B) from timing gear cover.
3. Before installing sensor, check sensor-to-crankshaft timing wheel dimension, using one of the following methods.
Measure sensor depth using JDG1334 Depth Checking Tool:
Install JDG1334 Depth Checking Tool (G) in sensor bore in timing gear cover and tighten by hand.
Push in on pin (C) until it firmly contacts timing wheel (H).
Check position of pin end (C) in relation to top surface of tool as shown in (D, E and F).
If the lower shoulder of the pin extends above the top surface of the depth tool (D), sensor depth is too low. Add one R60756 shim to sensor when installing.
If the lower shoulder of the pin is within ranges of marks (E), sensor depth is correct and no shim is required. (The correct sensor depth is between the top of the pin and the lower shoulder of the pin flush with the top surface of the depth tool.)
If pin end is below top surface of depth tool (F), sensor is too high. Further investigation is required. Contact your Dealer DTAC representative.
Crankshaft Position Sensor
Using JDG1334 Depth Checking Tool
A—Machined Mounting Surface (Spotface) B—Crankshaft Position Sensor
C—Pin (In JDG1334 Depth Checking Tool) D—Sensor Depth Low (Shim Required) E—Sensor Depth Correct (No Shim Required) F—Sensor Depth too High (Requires
Investigation)
G—JDG1334 Depth Checking Tool H—Crankshaft Timing Wheel
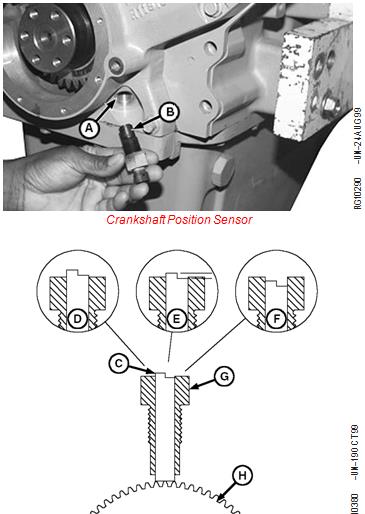
If JDG1334 Depth Checking Tool is not available, use a depth gauge to measure distance from sensor spotface (machined mounting surface) (A) on timing gear cover to face of crankshaft timing wheel tooth and
Specification
Crankshaft Position Sensor Spotface (Mounting
Surface)-to-Crankshaft Timing
Wheel Tooth—Distance........................... 36.7—38.2 mm (1.44—1.50 in.)
If distance is less than 36.7 mm (1.44 in.), install R60756 shim when installing sensor. If distance is greater than
38.2 mm (1.50 in.), further investigation is required. Contact your Dealer DTAC representative.
4. Coat O-ring on sensor with JDT405 High Temperature Grease.
5. Install sensor (and shim if required) in timing gear cover. Tighten to specifications.
Specification
Crankshaft Position Sensor—
Torque ............................................................................. 14 N•m (10 lb-ft)
RG,RG34710,274 –19–13AUG99–2/2
Connectors
Connectors are devices that provide for assembly and machine Operation and Tests manual for disassembly of systems. Connectors should always be complete wiring diagrams, including serviced using tools designed for that type of connectors.
connector. A good crimp is important to mechanical
and electrical soundness. Repaired connectors should IMPORTANT: If for some reason the connectors
be physically tested by pulling to be sure the contact is are not connected, such as when the
firmly attached to the conductor. fuel injection pump is removed, it is important to protect the connectors
NOTE: See ELECTRONIC CONTROL SYSTEM from debris.
OVERVIEW in Section 03, Group 140 for
diagrams showing location of sensors and Refer to the procedures which follow for repair of
connectors. For vehicle engines, refer to various types of connectors.

John Deere Qianglu engine accessories supply re504836 oil filter, John Deere Qianglu engine accessories supply l167630 sealing ring, John Deere accessories supply sj37386 sj33338 sj37387 sj33676 sj33675 switch, c469f593ab, 26387 solenoid valve, Snyder 26387 solenoid valve, Qianglu 26387 solenoid valve, 32777 pressure plate, starnai 32777 pressure plate, Qianglu 32777 pressure plate, 32777 repair kit, 33702 repair kit, starnai standyne33702 repair kit, Qianglu 33702 repair kit, Cummins qsl9.3 injector 4359204, Cummins 4359204 injector, 4359204, Bosch 0433171958 nozzle, dlla145p1552 nozzle, 0414701041 pump nozzle, John Deere Qianglu engine parts supply al202199 headlights, John Deere Qianglu engine parts supply re554882 camshaft, John Deere Qianglu engine parts supply re543935 water jacket bushing, John Deere Qianglu engine parts supply re531804 fuel pipe, John Deere Qianglu engine parts supply re52242 discharge plug, John Deere Qianglu engine parts supply re527018 thermostat, electric dlla139p851 fuel injector uses 095000-5840re520240re520333 fuel injector, Delphi hdf807 filter uses Weichai wp10wp12wp615, man 16-12x1.5 elbow, man 16-12x1.5 direct head, John Deere engine parts 38h500261m5002 straight stud (SDS) hole, John Deere engine parts 45m7080 elastic lock pin, John Deere engine accessories 51m7041o-ring,
400-100-8969???15088860848
0574-26871589? 15267810868
0574-26886646? 15706865167
0574-26871569 18658287286